Yesterday I posted a photo of Orion that I'm pretty happy with. I included basic technical notes, but here are some additional anecdotes on the image and processing.
Min Yun asked about the filter (digital signal processing, not glass) I used. This was done with Nebulosity 4.4's "Std. Dev. filter (1.5 - typical)". The documentation is a shade vague, but I believe this discards everything more than 1.5 s.d. above & below the mean, then averages. In my first processing attempts I used straight "Average/Default", which would be mean. Perhaps it's partly because I got better, rather than just the difference in the filter, but this looks quite a bit less noisy than my earlier efforts. Min suggests I try 50th %ile, just using the median. Turns out the software supports that. Hmm, I should give it a shot.
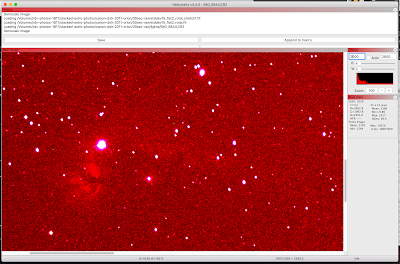
Here's a view of one of the raw images, zoomed in around the Horsehead and Flame.
Look at the tool on the right, and you'll see I've set the display to rescale color in the range 2500-2800. This is after demosaicing (turning the raw black & white pixel values into a color image), but with no other processing done on it. If you look closely at the histogram, you'll see three peaks, which (left to right) are green, blue and red. The current scaling basically hides all of the blue and green. The reds on this camera accumulate counts much faster than either blue or green, which I've spent a LOT of time investigating. When I first saw these, I assumed it was skyglow from city lights, but the same thing is true for my dark frames, so it's the sensor. I don't know if there is some camera setting I should be adjusting, or if I should be tweaking the raw import function. Nebulosity supports a modest number of Canon models, but doesn't have a direct entry for the EOS 7D. I tried them all, some were different, none were better. (As an aside, I would find a better histogram tool, that showed three separate curves, useful; most imaging programs, like GIMP and Photoshop, have that as a default. I think the author of this software does a lot of his work one channel at a time, before combining colors and doing finishing work in another tool.)
Below the bright star you can see the Flame Nebula, standing out above the noise. In the center of the image, you can maybe, maybe, see a dark spot emerging? That's the Horsehead.
Here's the exact same region of the image, after stacking 47 exposures and using 13 dark frames to reduce the floor. (Note the differences in the histogram and in the B & W sliders. The values are different both because of the dark removal and averaging, and because the above one was 14-bit Canon raw, and this is 16-bit FITS.) Now we have a view!
Next we do a power stretch, to bring up the details on the bottom end of the intensity scale. (n.b.: this is also necessary to keep the Orion Nebula, M42, in a reasonable range; clamping the values like the image you see above turns M42 totally white. M42 is to the right and above, out of frame in this zoomed view, but is important to the final image.)
Here's a close-in zoom of the Horsehead, after all the processing. (Click on it to open up and look closer.) This is the number of pixels I've got there, and you can still see some noise. You can also see how good my alignment and mount are, as well as limits of the optics and seeing, by looking at the stars. The really oblong one at the horse's neck is probably an unresolved double star, which you can tell by comparing it to the surrounding stars. The others show drift toward the lower right of about two pixels, which I calculated elsewhere is about the amount of movement in one thirty-second frame.
All of this took me about twenty hours of learning and fiddling and watching YouTube and reading docs, though it sounds simple once I summarize it like this. There are a lot of tutorials on the web on astro image processing, but figuring out which ones to watch is a chore in itself!
Min asked if I'm doing anything about cosmic rays. Not particularly. The dark frames handle "stuck" (or "hot") pixels as well as the current that accumulates even when no light is coming in. With only 47 light frames and set at ISO 1600, you can see that there is a ton of pure noise; I think most of that is thermal/shot noise rather than cosmic rays. A lot of serious amateur astrophotographers have adopted cooled CCD cameras, that work at -10C to -30C. I'd like to have one, but they seem to be expensive, and no doubt are a learning curve in their own right.
To return to the "red accumulates faster" thing, here's M42 from one of the raw images without any adjustment.
Oh, and the final interesting thing from the shoot itself: a train of high-altitude, very dark satellites flew smack through the middle of M42 while I was shooting! Here's a view from the same raw image above.
There are about five of them, moving very slowly and obviously very dark. It took them about 3-4 minutes to cross the area of my frame, about 5 degrees. That's the amount of time it would take an LEO satellite or the ISS to cross the entire sky. They must be thousands of km up. I kept the frames they cross in my total stack, but their trails are tossed out by the stacking algorithm.
Hope you enjoyed this tour through my brain, and my last couple of weeks. See you in the stars, or at least online. Stay safe!


No comments:
Post a Comment