Monday, December 21, 2020

M42: November Orion, Revisited


(Click for a bigger view!)

I went back and re-processed data from 2020/11/22, used for this image. This time, I included the 10-second exposures, which is how I got the detail in the core of M42 that was blown out in the earlier pic.

I stacked 95x10sec exposures (with 15x10sec darks and the same flats I used for the earlier pic), then took that image and the 47x30sec stacked image, adjusted them so their histograms were similar, then stacked those two. It worked remarkably well; if you look closely at the two images, this one not only has more in the core, it has more detail in a few places, some of the stars are sharper, and importantly, the noise levels are substantially lower.

I think the optics & mechanics I used could still give a little more, if I shot at 200mm instead of 145mm focal length and took more lights, and especially more darks and flats. But I think this is pretty close to the limits of the data I have at this point.

Sunday, December 06, 2020

Nebulosity Processing: A Few Comments on the Orion Photo

 Yesterday I posted a photo of Orion that I'm pretty happy with. I included basic technical notes, but here are some additional anecdotes on the image and processing.

Min Yun asked about the filter (digital signal processing, not glass) I used. This was done with Nebulosity 4.4's "Std. Dev. filter (1.5 - typical)". The documentation is a shade vague, but I believe this discards everything more than 1.5 s.d. above & below the mean, then averages. In my first processing attempts I used straight "Average/Default", which would be mean. Perhaps it's partly because I got better, rather than just the difference in the filter, but this looks quite a bit less noisy than my earlier efforts. Min suggests I try 50th %ile, just using the median. Turns out the software supports that. Hmm, I should give it a shot.


Here's a view of one of the raw images, zoomed in around the Horsehead and Flame.


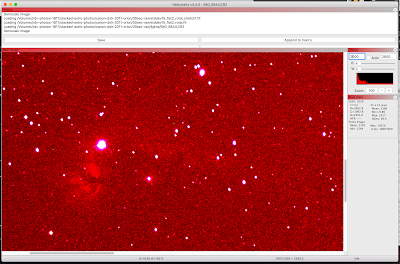
Look at the tool on the right, and you'll see I've set the display to rescale color in the range 2500-2800. This is after demosaicing (turning the raw black & white pixel values into a color image), but with no other processing done on it. If you look closely at the histogram,  you'll see three peaks, which (left to right) are green, blue and red. The current scaling basically hides all of the blue and green. The reds on this camera accumulate counts much faster than either blue or green, which I've spent a LOT of time investigating. When I first saw these, I assumed it was skyglow from city lights, but the same thing is true for my dark frames, so it's the sensor. I don't know if there is some camera setting I should be adjusting, or if I should be tweaking the raw import function. Nebulosity supports a modest number of Canon models, but doesn't have a direct entry for the EOS 7D. I tried them all, some were different, none were better. (As an aside, I would find a better histogram tool, that showed three separate curves, useful; most imaging programs, like GIMP and Photoshop, have that as a default. I think the author of this software does a lot of his work one channel at a time, before combining colors and doing finishing work in another tool.)

Below the bright star you can see the Flame Nebula, standing out above the noise. In the center of the image, you can maybe, maybe, see a dark spot emerging? That's the Horsehead.

Here's the exact same region of the image, after stacking 47 exposures and using 13 dark frames to reduce the floor.  (Note the differences in the histogram and in the B & W sliders. The values are different both because of the dark removal and averaging, and because the above one was 14-bit Canon raw, and this is 16-bit FITS.) Now we have a view!


Next we do a power stretch, to bring up the details on the bottom end of the intensity scale. (n.b.: this is also necessary to keep the Orion Nebula, M42, in a reasonable range; clamping the values like the image you see above turns M42 totally white. M42 is to the right and above, out of frame in this zoomed view, but is important to the final image.)


And now we're pretty much there! I did one final tweak in GIMP to raise the middle of the dynamic range while keeping the top and bottom the same, which gave the image you saw yesterday.

Here's a close-in zoom of the Horsehead, after all the processing. (Click on it to open up and look closer.) This is the number of pixels I've got there, and you can still see some noise. You can also see how good my alignment and mount are, as well as limits of the optics and seeing, by looking at the stars. The really oblong one at the horse's neck is probably an unresolved double star, which you can tell by comparing it to the surrounding stars. The others show drift toward the lower right of about two pixels, which I calculated elsewhere is about the amount of movement in one thirty-second frame.


All of this took me about twenty hours of learning and fiddling and watching YouTube and reading docs, though it sounds simple once I summarize it like this. There are a lot of tutorials on the web on astro image processing, but figuring out which ones to watch is a chore in itself!

Min asked if I'm doing anything about cosmic rays. Not particularly. The dark frames handle "stuck" (or "hot") pixels as well as the current that accumulates even when no light is coming in. With only 47 light frames and set at ISO 1600, you can see that there is a ton of pure noise; I think most of that is thermal/shot noise rather than cosmic rays. A lot of serious amateur astrophotographers have adopted cooled CCD cameras, that work at -10C to -30C. I'd like to have one, but they seem to be expensive, and no doubt are a learning curve in their own right.

To return to the "red accumulates faster" thing, here's M42 from one of the raw images without any adjustment.


Oh, and the final interesting thing from the shoot itself: a train of high-altitude, very dark satellites flew smack through the middle of M42 while I was shooting! Here's a view from the same raw image above.


There are about five of them, moving very slowly and obviously very dark. It took them about 3-4 minutes to cross the area of my frame, about 5 degrees. That's the amount of time it would take an LEO satellite or the ISS to cross the entire sky. They must be thousands of km up. I kept the frames they cross in my total stack, but their trails are tossed out by the stacking algorithm.

Hope you enjoyed this tour through my brain, and my last couple of weeks. See you in the stars, or at least online. Stay safe!


Saturday, December 05, 2020

The Importance of Polar Alignment

 One of the major innovations in amateur astronomy since I was a kid is the regular use of polar alignment scopes. They existed, but were beyond my budget and patience as a fifteen-year-old. Now they are standard features on a lot of mounts, including my Kenko Sky Memo S.

So, how good does your polar alignment have to be for astrophotography?

Let's say you're off by one degree, toward R.A. 0, for simplicity. That means that if you're aiming at something at the equator (where the effect will be the worst), your aim will be a degree low at R.A. 0 and a degree high at R.A. 12h. The maximum slew rate will be when you're looking at R.A. 6h or 18h.

How fast is that slew rate? Let's see...that up and down cycle will be two pi per 24 hours...max slope of a sine wave is 1, but gotta match those units...one radian per 3.82 hours...so that would be a max rate of one degree per 3.82 hours. That's 15.7 arcminutes or 942 arcseconds per hour. About one arcsecond of drift every four seconds.

Is that a lot? Well, my professional astronomer friends tell me the seeing at sea level is about 1 arcsecond, at best. It's also about the diffraction limit for a 100mm objective, roughly. So worst case, this would limit our exposure time to four seconds, if our alignment is off by a full degree.

But whether we are working near that limit depends on focal length and camera resolution, too. My Orion photo I just posted was about 3k*5k pixels in the original, covering about 5x7 degrees (before I cropped), shot at 145mm f.l.  I calculated that one pixel in that image is about 6 arcseconds.  (All of this is very back-of-the-envelope, so call it 4 to 8 if you're picky.) So, a 1 degree misalignment would drift by 1 pixel in 24 seconds (well, 20-30, give or take). Since I was stacking 30-second exposures, I only needed to be within one degree!

Very roughly, eyeballing my raw images, over about 25 minutes I drifted by about 90 pixels, about two pixels per shot. A little more than I'd like, but with the stacking I did, not noticeable. In fact, zoomed all the way in, the best stars don't really show any distortion in that direction.

So, I thought I had the polar alignment really nailed during that shooting session, but I might have been off by a full degree. (As it happens, I had to allow rotation as well as translation in the alignment of my stack, which may be due to polar misalignment.)

So I'm in pretty good shape for 30sec exposures with the Canon 70-200mm zoom lens. But if I'm going to shoot long exposures with the new C90 Mak, f.l. 1250 and f/14, I'm going to have to do a lot better than one degree. (I'm also going to need a lower-vibration mount.)

Of course, serious astrophotographers shooting at long focal lengths usually guide their scopes, for exactly this reason, using a longer-f.l. scope and a lighted reticle eyepiece to keep the imaging rig pointed right. It's pretty arduous work. But technology is making this one easier, too, if you've got the budget!

Orion: M42, M43, Horsehead and Flame Nebulae

M42, M43, Horsehead and Flame Nebulae in Orion

This is the same data I've been working with for a few weeks now. The two bright stars on the left are two-thirds of Orion's belt, and the bright nebula on the right is the main part of his sword hanging down.  (The image is rotated 90 degrees from what we usually think of as "up" with Orion.) Specs:

  • Camera: EOS 7D
  • Lens: Canon EF 70-200mm f/2.8
  • focal length: 145mm
  • f/2.8
  • ISO 1600
  • Mount: Kenko SkyMemo S equatorial tracker
  • Exposure:
    • lights: 47 frames, 30 seconds each
    • darks: 13 frames, 30 seconds each
    • flats: 10 frames using above setup, but I don't really trust them
    • bias: none (should I? given how much noise is the problem here...)
    • First aligned with rotation (two-star alignment), then stacked using std. dev. 1.5 filter, throwing out extreme points
  • Field of view: approx. 5x3 degrees as cropped
  • Image size: 3338x2225 as cropped
  • Resolution: very roughly, 6 arcseconds per pixel, smallest stars are about 4x4 pixels, so 25-30 arcseconds resolution, I guess, but the brighter stars are about 20x20 pixels
  • Faintest stars in the image: good question! I wish I knew.
  • Software: Nebulosity 4.4.3, GIMP 2.10
  • Date/time: 2020/11/22, about 2:00 a.m. local time
  • Location: Arakine Dam, Chiba, Japan
I have learned a ton about CCDs and image processing, but I have probably learned more about this specific camera/sensor and this specific piece of software than about the principles. Because I had so much learning to do, this photo is probably about 20 hours worth of sitting in front of the computer working.
I'm also sitting on 100 frames at 10 seconds, which might add some detail in the middle of M42. I don't know if it's possible to combine them effectively with this or not. I would still like to make the Horsehead more vibrant, but M42 is so bright, that everything I've done to try to brighten the Horsehead turns M42 into just a wash of white. More to learn, yet, but I think this is pretty close to all that this data has to give.
I'm having fun...

Tuesday, December 01, 2020

C90 Mak: Saturn


 Best shot I got out of a couple of dozen.

Prime focus, 90mm objective, 1250mm f.l., f/14, ISO 800, 1/10th of sec. C90 Mak lens, EOS 7D camera.

Kenko SkyMemo S equatorial tracking drive & accompanying wedge and tripod, roughly hand-aligned using a level and compass (no line of sight to Polaris, and set up before dark, anyway). Vibration is a big problem at this f.l. Most of my shots, even with a 1/10th second exposure, were smeared.